For several decades, magnesite flooring offered a practical and cost-effective solution in both residential and commercial settings. Its core material, magnesium oxychloride, was prized for its ease of installation and fire resistance. However, time has revealed significant issues that can render magnesite flooring hazardous, especially regarding moisture absorption and its impact on the building structure, making professional solutions such as remedial waterproofing Sydney increasingly important for addressing these concerns.
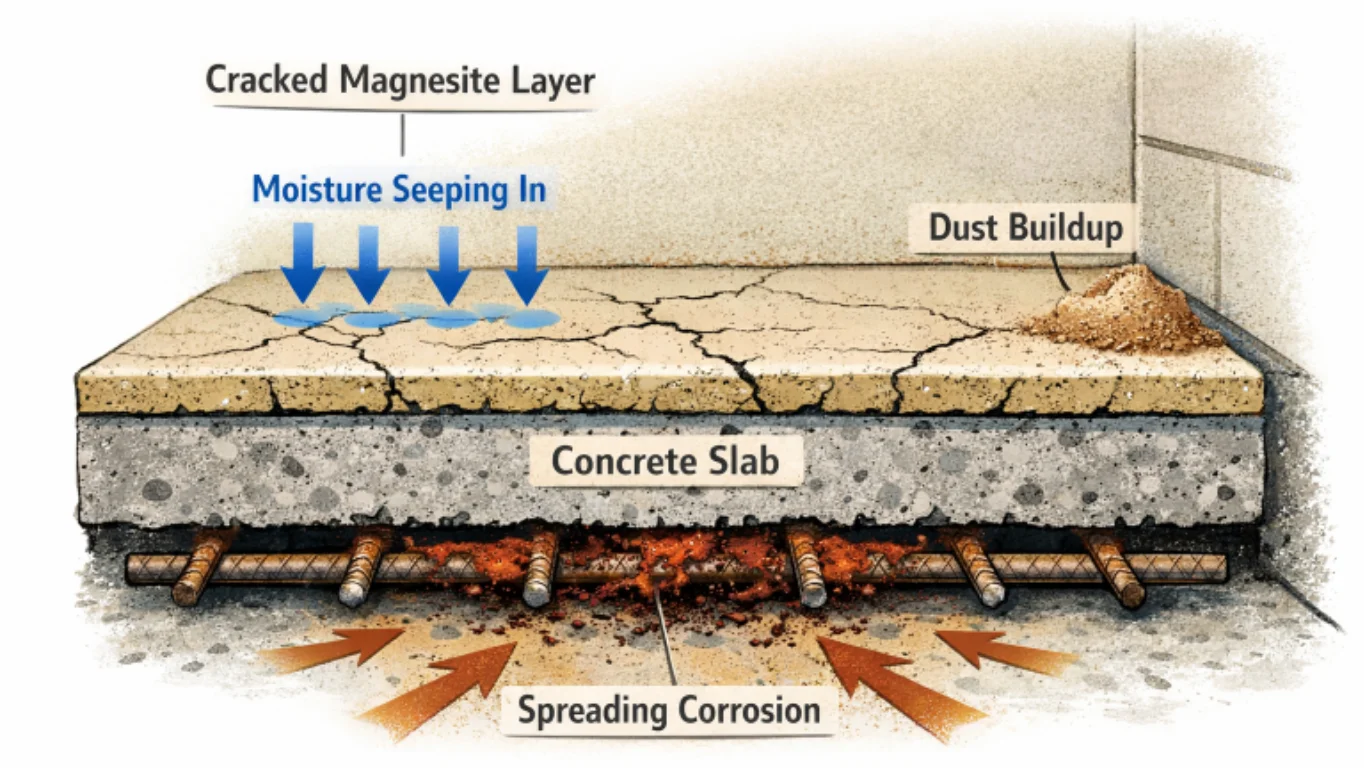
The primary drawback of magnesite flooring is its vulnerability to moisture. When exposed to moisture, magnesite can decompose, releasing chloride ions. These ions seep into the underlying concrete slab, accelerating corrosion of the steel reinforcement and potentially jeopardizing the building’s structural stability. Moreover, as magnesite breaks down, it can generate significant dust and pollutants, presenting health concerns for occupants.
Risks Associated with Magnesite Flooring
Building owners need to be aware of the dangers linked with deteriorating magnesite. As moisture enters magnesite, it compromises the flooring’s integrity and threatens the reinforced concrete below by promoting rust. Over time, affected structures may experience spalling, cracks, and even partial structural collapse. Additionally, chronic moisture allows harmful mold and bacteria to thrive in the subfloor area, exacerbating health risks.
Beyond structural compromise, magnesite’s physical breakdown releases fine dust that can circulate throughout living spaces. Prolonged exposure to these particles can have respiratory effects and contribute to an unhealthy indoor environment.
Signs Indicating the Need for Magnesite Removal
Timely intervention is crucial to prevent escalating repair costs. Common indicators that your magnesite flooring may need removal include:
- Visible cracks across floor tiles or the underlying concrete.
- Soft, spongy areas when walking over the floor.
- Discoloration or dark stains, particularly near walls and corners.
- Noticeable bulges or unevenness beneath the surface or under carpets.
- Persistent musty or damp odors that linger after ventilation.
Promptly addressing these symptoms can help limit the spread of deterioration and protect both residents and structural elements.
Steps for Safe Magnesite Removal
Magnesite removal must be systematic to ensure safety and prevent accidental damage:
- Assessment: Begin with a thorough inspection to determine the extent of magnesite deterioration. Identify areas with the most severe moisture ingress or structural distress.
- Preparation: Remove all furniture and contents from the workspace. Ensure the area is well-ventilated and workers are equipped with appropriate safety gear, such as masks and gloves, to protect against dust and debris.
- Removal: Use suitable hand or power tools to carefully lift and chip away the magnesite without damaging the underlying concrete slab.
- Surface Cleaning: Once the magnesite is removed, thoroughly clean the concrete to remove any residual dust or particulate matter, preparing the substrate for inspection and repairs.
- Inspection and Repair: Evaluate the condition of the exposed slab. Address any cracks, exposed rebar, or corrosion through appropriate patching and reinforcement before installing new flooring.
Professional vs. DIY Removal
Removing magnesite flooring is physically demanding and carries health and safety considerations. While it may be tempting to undertake the task independently, homeowners often underestimate the tenacity of magnesite’s bond to concrete and the health hazards related to dust exposure. Professional contractors possess advanced equipment and are adept at managing both removal and site safety, adhering to strict regulations to protect your property and its inhabitants. Engaging professionals helps guarantee optimal results and peace of mind.
Post-Removal Considerations
Once magnesite and all contaminants are cleared, additional steps are required to prepare the floor for its next chapter:
- Surface Leveling: The removal process often leaves the concrete uneven or pitted. Applying a self-leveling compound can help create a consistent, smooth substrate for future flooring.
- Moisture Testing: Verify the concrete’s dryness before introducing new materials. Skipping this step can lead to further moisture problems or premature flooring failure.
- Choosing New Flooring: Select flooring solutions tailored to both your preferences and the site’s specific needs, ensuring that the new covering is moisture-resistant and suited to the property’s intended use.
Preventative Measures for Future Flooring
Future-proof your floors by adopting best practices:
- Proper Installation: Always follow manufacturer and industry recommendations to avoid installation errors.
- Moisture Barriers: Employ vapor barriers or advanced waterproofing methods to seal the subfloor and minimize the risk of future water ingress into the new flooring and the concrete below.
- Regular Maintenance: Schedule routine inspections to detect and address early signs of moisture or deterioration, preserving aesthetics and value over time.
Final Thoughts
Effective removal of magnesite flooring restores your property’s safety and value. A clear understanding of the risks, timely identification of telltale signs, and a structured approach to removal are essential in preserving the integrity of your concrete slab. Engage experienced professionals where possible for efficient, code-compliant removal. With the right post-removal steps and preventative measures, you can look forward to a refreshed, secure floor that stands the test of time.